If you want to build a basic free standing pergola but you haven’t found yet the right plans or detailed instructions, we recommend you to pay attention to this woodworking article. Moreover, we recommend you to modify the design and the size of the patio pergola as to fit your needs and budget, before starting the actual construction project. Work with attention and take a look over the rest of the articles.
It is essential to invest in quality and weather-resistant materials, as the pergola will be exposed to moisture and excessive sunlight. Select the wooden components that don’t have visible flaws and are perfectly straight, otherwise the pergola might not look as good as you’ve imagined. Always pre-drill the components before inserting the screws, to prevent the wood from splitting and to create strong bonds.
Patio Pergola Plans
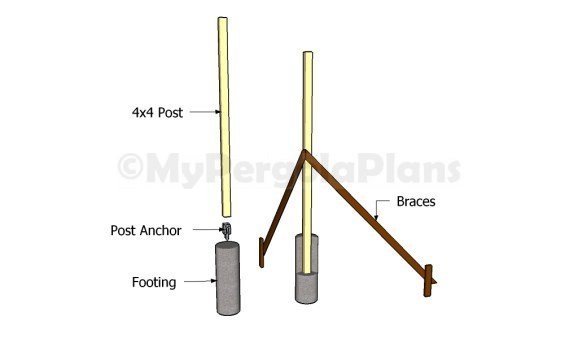
Installing the posts into place
You need to decide form the very beginning how you will secure the posts into place. Therefore are several alternatives you can choose from, such as setting the posts into concrete or pouring footings and using metal anchors.
Irrespective of your choice, we suggest you to dig 3′ deep holes and to set the post perfectly plumb before pouring the concrete. Use wooden braces to secure the posts temporarily otherwise they might move from position.
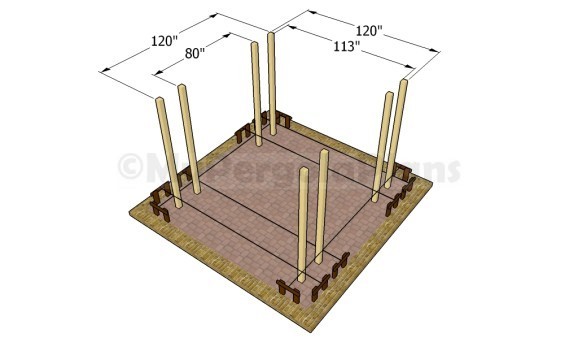
Fitting the posts into place
Laying out the patio pergola is an essential task, so make sure you use batter boards and string, if you aim for a professional and accurate result. In addition, check if the corners are right-angled by applying the 3-4-5 rule or by using a large L-square.
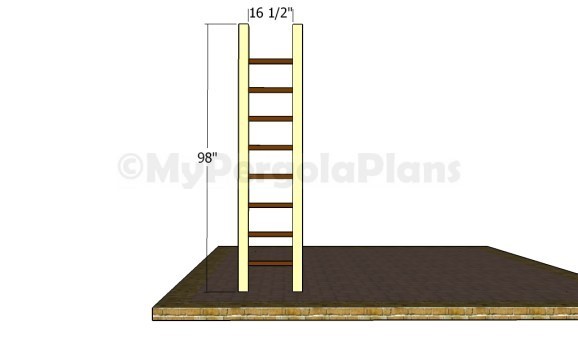
Attaching the panels
Continue the pergola project by attaching the 2×2 components between the 4×4 posts, as shown in the image. Place the pieces of lumber horizontally and as equally-spaced as possible. Drill pocket holes at both ends of the components before locking them to the posts with 2 1/2″ screws.
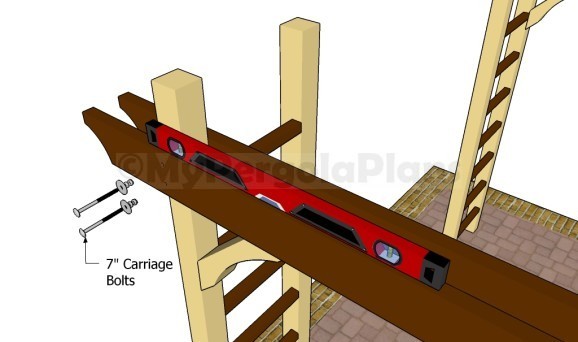
Installing the supports
Attaching the support beams on both sides of the patio pergola is complex process, as the components are heavy and you need to secure them into place with carriage bolts. Therefore, cut the ends of the 2×6 beams (144″ long) in a decorative manner, by using a jigsaw.
Clamp the beams to the top of the posts, drill pilot holes and lock them into place with 7″ carriage bolts. Place a spirit level on top of the beams to check if they are perfectly horizontal.
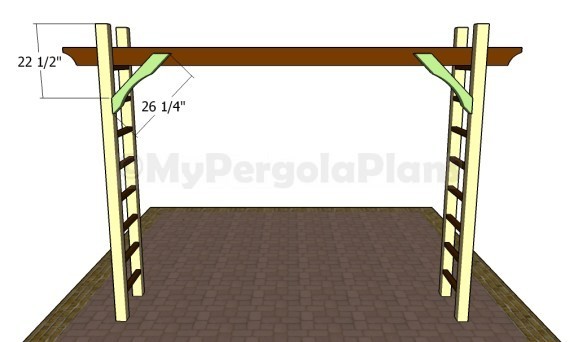
Attaching the braces into place
Adding 4×4 braces is not compulsory, but it will most certainly add strength to the structure and enhance it in a professional manner. Cut both ends of the braces at 45 degrees, by using a circular saw before attaching them into place with screws. Pre-drill the components with a drill machinery to prevent them from splitting.
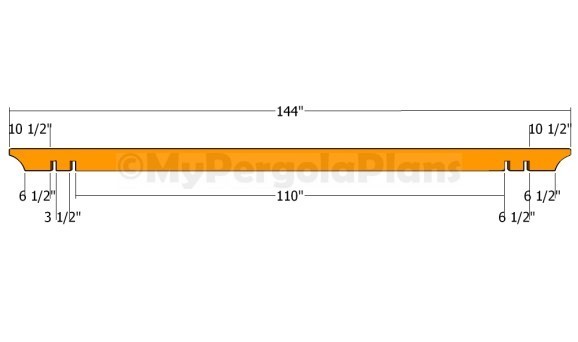
Building the rafters
Building the rafters is also a task you need to pay attention to, as it requires proper measurements and cuts. After marking the cut lines on the rafters, we recommend you to create the notches with a circular saw. Make several parallel cuts inside the marked areas and remove the excess material with a chisel. Clean the surface with medium-grit sandpaper before fitting the rafters into place.
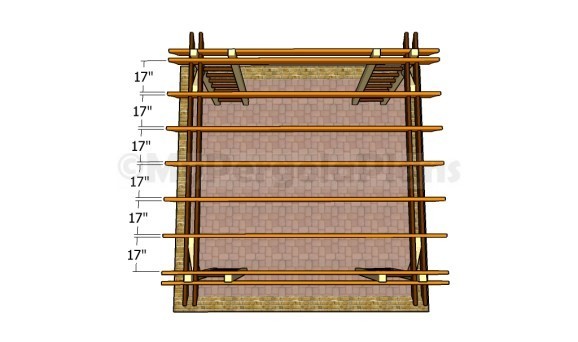
Attaching the rafters
As a rule of thumb, the more rafters you add to the roof of the pergola, the less light will come through it. Similarly, if you want to get a lot of light through the roof of the pergola, we recommend you to place less rafters than shown in the diagram. Align the rafters at both ends, in order to make sure they are equally spaced, drill pilot holes and lock them to the support beams with 5 1/2″ galvanized screws.
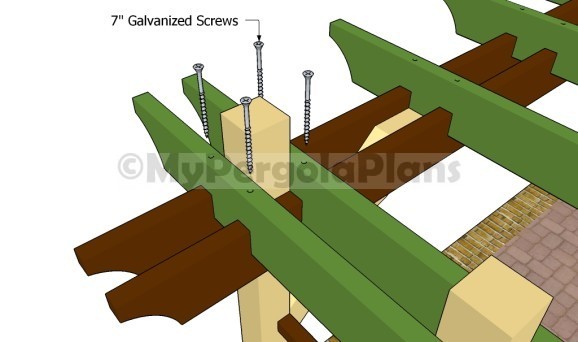
Securing the rafters to the support beams
After drilling the pilot holes, we recommend you to insert 5-7″ screws, in order to create durable joints. It is essential to use several screws, otherwise the structure won’t be rigid enough.
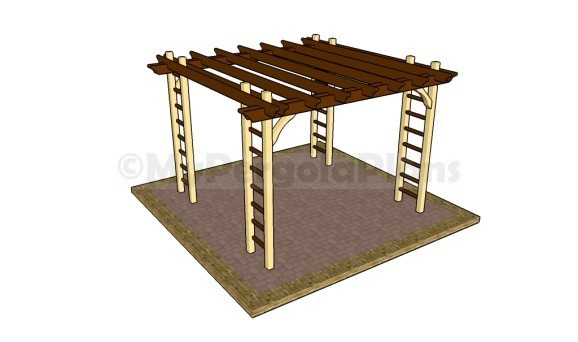
Patio pergola plans
Last but not least, we recommend you to pay attention to the finishing touches. Therefore, check if all the screws are inserted properly and fill the holes with wood putty. Smooth the surfaces with 120-grit sandpaper along the wood grain. In addition, apply several coats of paint over the components in order to protect them from decay and to enhance the look of the free-standing pergola.
Tools & Materials
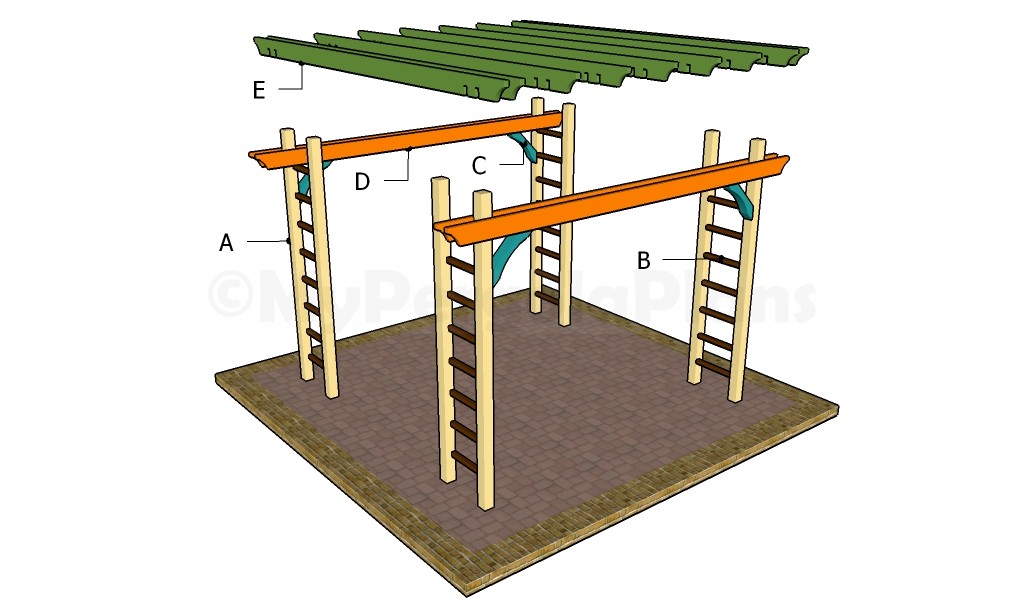
Building a patio pergola
- A – 8 pieces of 4×4 lumber – 96-98″ POSTS
- B – 8 pieces of 2×2 lumber – 16 1/2″ SUPPORTS
- C – 4 pieces of 2×6 lumber – 26 1/4″ BRACES
- D – 4 pieces of 2×6 lumber – 144″ SUPPORT BEAMS
- E – 9 pieces of 2×6 lumber – 144″ RAFTERS
- Safety gloves and glasses
- Circular saw, Jigsaw
- Tape measu, Spirit level, Carpentry pencil
- Drill machinery and Drill bits


