If you are looking for a cheap and straight-forward project that will add value to your garden and enhance the look of your property, then these plans are going to fit you needs perfectly. In most of the cases, a garden arbor doesn’t require a building permit, so you should just select free arbor plans that match the style of your garden and come with detailed instructions and diagrams.
In addition, we suggest you to spend some time when buying the materials, as you should select weather-resistant lumber which also comes with a nice finish. Therefore, cedar, pine or redwood are proper choices, provided the components are in a good condition and perfectly-straight. Work with attention and don’t forget to modify the design and the size of the arbor to fit your tastes.
Free Arbor Plans
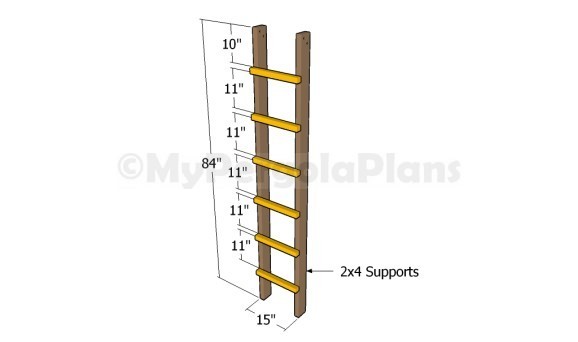
Building the sides of the arbor
The first step of the project is to build the sides of the wooden arbor. In order to get the job done, we recommend you to build the legs out of 2×4 slats and to attach small pieces of 1×1 or 2×2 lumber. Lay the slats on a level surface and make sure they are perfectly parallel. Drill pilot holes through the supports and lock them into place with 2 1/2″ galvanized screws. Check if the corners are right angled after attaching every component.
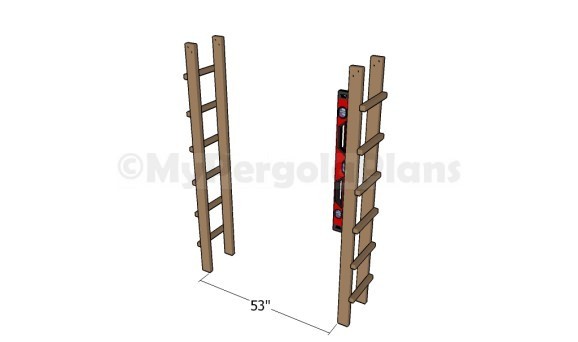
Setting the sides into place
It is essential to plumb the sides of the arbor with a spirit level, especially if you want to lock them into place permanently. Therefore, pour 3′ deep concrete footings and fit metal anchors. After making sure the sides are plumb, we recommend you to lock the legs to anchors with carriage bolts.
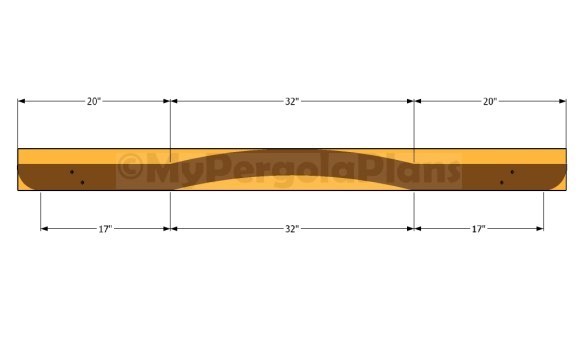
Building the top of the arbors
Building the arched top is a complex task, but if you mark the cut lines properly, you shouldn’t face any kind of problems when building the supports. Smooth the cut edges with fine-grit sandpaper after making the cuts with a jigsaw.
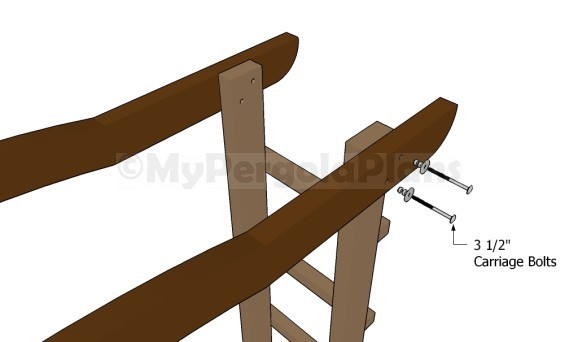
Fitting the arch supports
The next step of the project is to attach the supports to the top of the legs with carriage bolts. Drill pilot holes through the components before inserting the screws and make sure you don’t over-tighten the nuts to prevent the wood from splitting.
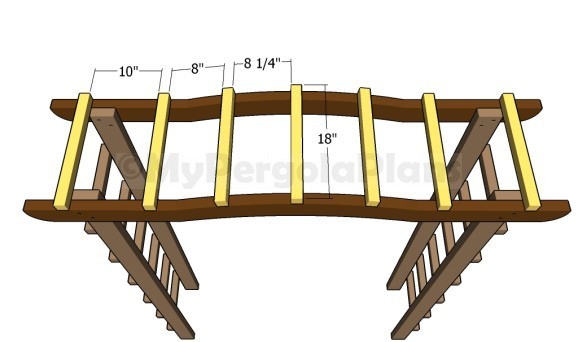
Attaching the slats to the arch
Continue the woodworking project by attaching the supports to the arched top of the arbor. As you can easily notice in the image, we suggest you to cut small pieces of 2×2 lumber and to attach them to the supports as equally spaced as possible. Pre-drill the components and insert 2 1/2″ galvanized screws into the supports, as they will be exposed to moisture.
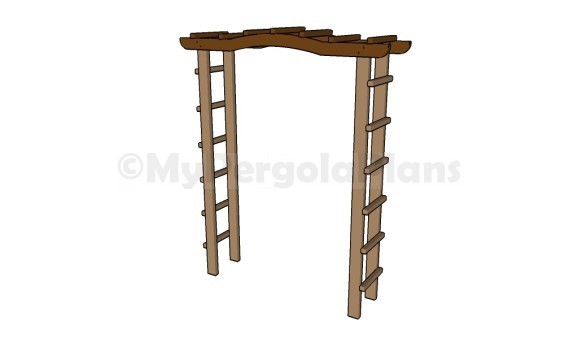
Garden arbor plans
Last but not least, we recommend you to pay attention to the finishing touches. Therefore, check if all the screws are inserted properly and fill the holes with wood putty. Smooth the surfaces with 120-grit sandpaper along the wood grain. In addition, apply several coats of paint over the components in order to protect them from decay and to enhance the look of the garden arbor.
Tools & Materials
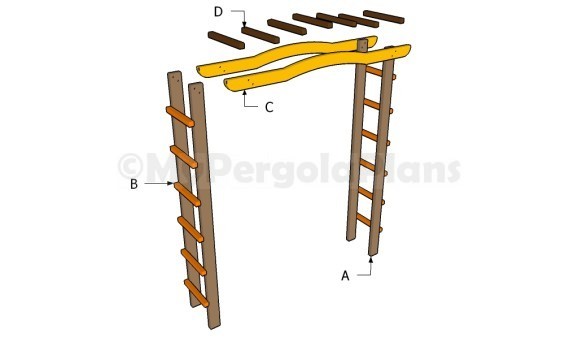
Building a garden arbor
- A – 4 pieces of 2×4 lumber – 84″ POSTS
- B – 12 pieces of 2×2 lumber – 15″ SUPPORTS
- C – 2 pieces of 2×6 lumber – 72″ ARCHED BEAMS
- D – 7 pieces of 2×2 lumber – 18″ RAFTERS
- Safety gloves and glasses
- Circular saw, Jigsaw
- Tape measu, Spirit level, Carpentry pencil
- Drill machinery and Drill bits


